Alfa Romeo Giulia Forum banner

Apple Carplay for 2017 model, we may just had a new option!

274K views 679 replies 113 participants last post by  Michelinu  
Ok. This is pretty exciting but I agree, why the heck can't we use the card existing mic? An additional mic is not something I want to have to deal with as I'm concerned call quality won't match up and that's pretty critical
 
Thank you so much Moose8106! Critical information for me! do have a couple of novice questions:
1. Do you disconnect the battery for install? I seem to remember that this is a two step process, not just removing the whole negative plate in one shot. If so does this need a recalibration of a bunch of stuff?
2. the BIG ASS harness has a white connector that goes into the KAP unit. This connector also two red wires labelled reear power and front power, a blue wire labeles front detect, and a brown wire labeled rear detect. Do these need to be used?
3. The BIG ASS harness also has a headphone plug (3.5 aux) does that plug into the port labelled SPK?
4. Did you use the two antenae tthat came with it? Assume this is for carplay only. Where did you stick them?

Thank you again

Rumi
 
MorganB.

U have to send them an email and then they'll respond. I elected to pay with PayPal which is a 7% surcharge. DHL shipping was super fast: 24hr from South Korea!!!

Moose8106, you're amazing. I'll try to do a video of my install based on your instructions. Hopefully get to it tomorrow: today is already going to hell at work...
 
Ok so I'm not completely finished, but I thought I'd tell you where I'm at. KPLAY unit connected in and seems to work well, at least in how it integrates with the car and how android auto functions. I have not tested apple carplay.
Installation is as follows - I will send a series of pics in a separate post from my phone but they will match the installation flow below:
1. get headunit exposed
a. remove plastic tray under dash on driver's side. This requires removing 5 torx screws. The whole thing comes out. It has two small lamps for floor lighting on in either side. These are secured with a small plastic trim ring on the underside that you can pinch to release. both lights needs to be detached from the tray to get it out.
b. left behind is a foam "cover". by removing a plastic trim fastenreron it's left side it can be folded over toward the transmission tunnel.
c. the head unit can now be seen. it is situated vertically under the dash. it is only held in by two larger trox screws. remove these and gently slide the unit down and out of its place taking care to work the wires down along with it. The unit should come out far enough that you can see it's front end and have very good access to all the wires connecting into it.
d. the main harness, what Moose8106 calls the "big ass harness", has a lever that you lift up to partially disengage it. I would look at the equivalent clip that replaces it eventually from the KLAP unit and play with it to get an idea of how it will come out without breaking it. Worth the ten seconds. The second wire that needs to be detached is the pink headed "LVDS cable". Again, look at the blue equivalent connector that comes with the KPLAY unit. YOu will see that the plug has one clip that secures it in place. If you push a fine screw driver into it it will detach more easily. I played with this by lugging and unplugging the LVDS replacement cable into the KPLAY unit to see where I had to push the pin to make it go in and out easiest. That is as far forward as you can get - not where your fingers can pinch it. NOw go back to the headunit and, poking the clip on the car's LVDS pink plug, release it.
e. At this point you have earned a beer. See photos that follow.
 

Attachments

Oops - photos loaded twice above. sorry
Moving on:
2. on a back table, set up the KPLAY unit.
a. set pin according to their instruction - only pin 9 is down for <2020 cars with 8.8 inch screen.
b. plug in, from attached picture, going clockwise from left to right all cables that come with the KPLAY unit:
LVDS cable plug that came with KPLAY into LVDS-in port
USB cable plug
MIC cable plug
SPK plug (off of the harness cable)
bluetooth cable plug
wifi cable plug
Power/CAN plug (off of the harness cable)
Note that when in stalling I ended up removing the MIC and reinserting as well as the USB, but at least this orients you on how it will eventually go. Also note that the 4 additional wires hanging off of the Harness are not used.

Now you've earned another beer
 

Attachments

Ok, let me backtrack -
to help pull out the inital under-dash tray, it helps to alsp pull out a small trim panel (kickplate?) that is on the transmission tunnel under the dash as well - I have no picture of this move, sorry. Also I forgot to take a picture of the pin adjustment on the KPLAY unit, but it is pretty obvious
 
Now is time to run the MIC cable. Apparently the MIC is necessary for voice activation of Google assistant, and, depending how your phone is synced, maybe also for phone calls. Many ways to do this, but what I did was pull the little plastic perforated (mic) cover off of the headliner that is directly above and in front of you as you sit in the driver's seat. I then tucked the microphone from the KPLAY unit in there after running the cord laterally out the door frame trim. I pulled the cord to length so that the mic would sit in the hole without any slack. The mic has an alligator clip on it and I clipped it to the existing car mic wire (I think that's what it is!) that lives there so that it wouldn't rattle. The cable can be neatly run under the rubber door trim gasket all the way to the underside of the dash, where it can join its friends.
 

Attachments

The next part is to run the USB port. I think this too can be managed in a few ways. It seems most will hook it into the USB ort under the climate controls in the center column. accessing this is tougher than I thought- it is true that you have to wedge a flathead screwdriver or less traumatic tool into designated spots on the upper edge of the plate, but the clips behind this are pretty robust and you have to put quite a bit of force to release them. I'm not happy with how this went because I ended up with the opening in the trim becoming enlarged permanently, although probably not that noticeable to others. The USB port has two plugs, one fore a mini USB (old style) and one for power to light the trim around the USB port. There is a little circuit board inside the housing as part ot the set-up. You can get a short USB to Mini-USB conector and that way switch the connection from the car to the KPLAY unit. This would be the most elegant way to do things. When I tried this, my android auto connection was unstable. What I ended up doing was taking apart the whole USB plug and directly inserting the KPLAY USB female plugpoint in its place. I kept the trim ring, so it looks stock, but it won't light up. By doing this I ended up with a good wired connection for android auto and hope to have imporved the cahrging ability of the phone: someone pointed out that their phone slowly drained despite being plugged in earlier, and I wonder if excess cables and connections contribute. Basically, I think what I did was pretty inelegant, but I am more interested in a secure, high quality hard-wired connection. Running the USB cord from that port out to the footwell through the opening of the previously removed kickplate is not too hard, but I did fish it with a piece of wire. Sorry but I have no pics of this step. Also they would have been super ugly.
 
Now ( I think step 5?) connect everything up
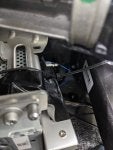
a.KPLAY harness "splitter" female side connects to main (BIG ASS) harness from car. KPLAY BIG ASS harness then plugs into head unit to replace stock harness. The white plug from the KPLAY unit and the speaker jack should already be plugged into your KPLAY unit.
b. The car's pink LVDS plug now gets plugged into the KPLAY LVDS-out port
c. The KPLAY LVDS cable, which is already plugged into the KPLAY LVDS-in port is now plugged into the head unit to replace the stock LVDS cable.
d. If you haven't already, plug back in the MIC and the USB cables into the KPLAY unit.
e. hopefully your buetooth and wifi antennae are still connected

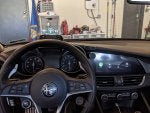
At this point everything is hooked up. I would turn on everything and take some time to make sure your connections are good and android auto or carplay works. turn on the car in accessory mode. Fo some reason, the first time I did this the display showed a smaller menu screen. later that went away, so not sure why. Hold the menu button down for two seconds. this will switch the screen over to the KPLAY unit. (Now go to the settings icon and make sure carplay is set to wireless if that's what you want.) come out of the settings and go to android auto. Make sure android auto is installed as an app on your phone and working. with the phone plugged in, android auto should open with the maps interface on the car's display. If you find the it repeatedly connects and disconnects, or won't connect, you have a bad USB cable. Turns out, of three cable, I only had one that works well enough. It seems to work well thankfully. Until then I was quite perplexed, wondering about software upgrades needed or security blocks on my phone - the usual anxieties. It's none of that - its the cable my friends. (Whew!). SO to backtrack, I did all this before running the USB cable through the center stack port, and that is why I opted to plug it in the way I did. I would say try out the connection as simply as possible and make sure it works before you add in a more complex path.

So that's where I'm at. Plan to put everything back in today. Really good news: this Korean unit works in US cars!
 
Final section on install.
6. Now that everything is connected and confirmed working, time to clean up and put stuff back in place.
In the phots, I am including one of the kick panel because I didn't earlier. it comes off just by pulling. No screws.
 
Moving on to putting things back:
I decided to attach the KPLAY unit to the headunit. Many ways to do thi, but I'll show you what i mean.
1. I put some gorilla tape (duct tape really) on the Kplay unit so that it would have some padding when against the head unit.
2. I wrapped it with another piece of tape, to later affix to the head unit - putting them together first would make it hard for me to squeeze them up into the hole.
3. Put the head unit back up into place. The extra main cable that involves the BIG ASS harness can fit mostly above (in the direction of the sky!) the headunit under the dash. put the two screws back into place to lock it in.
4. I snuk the KPLAY unit up into the same hole as the headunit, parrallel to it and just infront of it (toward the firewall). press it against the headunit and then use the gorilla tape to lock it into place by sticking (tape wraps onto the head unit).
5. Now I took a really long zip tie (actually I connected 4 zip ties to make a long one) and used it to strap the headunit and KPLAY units together.
6. removed 3M backing and stuck both wifi and bluetooth antennae up (I stuck them to the lip of the underside of the dash, but anywhere hidden will do - you don't have much length.
7. tucked all the wires away.
8. put the foam piece back in place and reattached the plastic trim fastener for it.
9. At this oint everything looks clean, but cables are still accessible. Good time to test everything out. Started her up and went for a short drive, testing how the GPS works, podcast apps, switching to radio etc. DID NOT CHECK if I could hear navigation directions over the radio. Will check on my next drive.
10. Put the plastic trim tray back into place. Reinserted both the floor lights using the clips. ocl back into place with clips and then put back in the 5 torx screws.
11. ALL DONE - time for a congratulatory beer.
 

Attachments